User:Pbsouthwood/Surveying dive sites

There are several ways to survey a dive site, The GPS track method I use is medium tech, moderate hardware cost, intermediate labour intensity, and is unaffected by visibility — results are the same in good viz or bad. It is quite interesting to return to a site you have extensively mapped in poor visibility on a day when you can actually see large sections of the structure. There is a strong and entirely understandable deja vu as you recognize structures in full size 3D that were previously only known as lines on the map and rather dim and murky shadows.
The GPS Track method
editHardware and software
edit Float with handheld GPS in waterproof box (open)
 Float with handheld GPS in waterproof box (closed)
 Side view of float with handheld GPS in waterproof box with ratchet reel
 Float with ratchet reel (underside)
 Diver's ratchet reel with DSMB and 100m of dacron 80kg braided fishing line for low drag
 Foam blank for surface marker float - top
 Foam blank for surface marker float - side
 Foam blank for surface marker float
 Survey SMB covered with pvc tarpaulin - top view
 Survey SMB covered with pvc tarpaulin - side view
 Survey SMB with GPS box fitted and GPS - top view
 Detail of Survey SMB with GPS box fitted and GPS - top view
 Detail of Survey SMB with GPS box fitted and GPS - top view
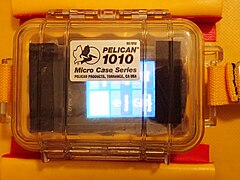 Detail of Survey SMB with GPS box fitted and GPS inside - top view
 Detail of Survey SMB with GPS box fitted and cover closed - top view
 Survey SMB with GPS box fitted and cover closed - top view
 Survey SMB with GPS box fitted and cover closed - side view
 Survey SMB - bottom view
 Dive reel with 80kg Dacron fishing line in use


The hardware is a reasonably splashproof pocket GPS in a watertight plastic box on a closed cell foam Surface Marker Buoy (SMB to divers) The float must be buoyant enough to not be pulled under at any time, and low drag. I find 8kg positive buoyancy is adequate. The float must be sufficiently buoyant that you cannot drag it under, and as low drag as possible so it stays above you as near as possible to vertical so the offset error is minimised. It should also remain upright as much as possible to get the best GPS signal reception.
I first used a boat-shaped float carved from an old boogie board, covered with a layer of orange PVC tarpaulin cloth for visibility and toughness, but have changed to a slightly shorter buoy which packs more compactly for travel, and has a little more buoyancy. The new float is also covered with PVC tarpaulin, for visibility and toughness. This time it is yellow. There is no noticeable difference in performance. I was given the foam as scrap.
The GPS I currently use is a Garmin e-trex 22e, which does the job very well and is very easy to upload as it has USB connection. Previously I used an e-trex 30, until the on/off button broke. My first e-trex Vista had an annoying tendency to occasionally turn itself off without any obvious reason in the middle of a survey, and used a serial port connection.
What is important is that the GPS records a downloadable track, and that the trackpoints should be close together, so you don't lose too much detail. The etrex 30 can resolve distances of 1 to 2m at swimming speeds, which is adequate for the purpose, as nominal accuracy is not quite as good.
The GPS unit is housed in a small transparent topped Pelican box, which is nominally waterproof, but often leaks a bit, so the GPS needs to be reasonably waterproof. I put it into a ziploc bag as an additional protection, and so far it has never been wet. The transparent top allows me to check if it is on when I am in the water, but this is not a critical point.
The box is strapped on so it cannot fall off, and a cover with velcro closures protects the screen from sunlight.
The box has a piece of soft closed cell foam padding with a cutout to support the GPS so it does not rattle around and bang its buttons. The float is towed at the end of a regular diving DSMB reel or spool line, whichever is more convenient. I have used both and both work well. A ratchet reel is slightly more convenient, but it is no big deal. The line should be strong enough that it will not break, but as thin as possible to minimise drag. Keeping the drag as low as possible helps in two ways.
- It is easier to tow, which reduces the effort, and helps with air consumption.
- It stays nearer to vertically above you when you swim. You need to keep a fairly high tension on the line to keep the line angle small, so may need a kilo or two extra weight, and stay somewhat negative while swimming the contours. To a large extent this can be managed simply by having less air in the BC.
The reels usually come with 1.5mm polypropylene braid, but 80kg braided dacron fishing line is strong enough and quite a bit thinner, so less drag. Spectra kite line can be even thinner, and is more abrasion resistant but it is more expensive. I find it is worth the extra cost. There is no disadvantage to a reasonably stretchy line, as it helps absorb the vertical force variations caused by surface waves. I use a bolt snap to attach the line to a stainless steel ring under the float. This is strong, reliable, fairly cheap and very convenient. Other methods can also work. Don't attach the line too close to the front of the buoy as it will then stand on end under tension and this will cause a lot of drag.
When swimming a contour, you keep the reel as close to the depth and side of the reef as conveniently possible. A small detour to avoid snagging on kelp, or keeping a metre further away to prevent snagging on the face of a cliff is not a problem, as the accuracy will not be degraded significantly. Surge, current and wind cause much bigger errors, and the data just needs to be good enough for the purpose, not perfect. We are making maps for divers, not creating a precise reconstruction of the seabed.
I use contours at 3 m intervals, which is close enough to give a good map without making the job needlessly big. Estimate the tide and allow for depth at half tide for Cape Town sites as this is the local standard. It also means that you can't be out by more than a metre from the datum if you judge the tide wrongly. Cape Town has maximum tidal range of about 2 m. At high tide, go about half a metre to a metre deep, and at low tide half a metre to a metre shallow. Don't lose any sleep over precision with this, and if in doubt, don't make any correction, you will probably be within half a metre.
In places with large tidal range, this may require more accurate corrections.
Adjust the depth of the line by reeling in or out until your dive computer shows the correct depth for the contour, then just keep the line taut. Swim along the reef with the reef to the left or right of the reel, depending on what you want to map. I find that if I change to another depth, I can identify the point on the track very easily if I change direction 180 degrees at the same time as the depth change. This is usually convenient for the planned survey. Remember what depth you swim and in which order, and reverse direction for each change. If surveying a deep site, it is obviously better to swim a deep contour first, then a shallow one, for maximising bottom time and lowest decompression risk, but sometimes this does not work out and you do what is possible. If you forget the depths, you can check back on your computer as long as it is set to the same time as the GPS. If you take a photo of the display every time you change depth you will have a permanent and reliable record that is easy to consult.
If you have a compact underwater camera, and use it while surveying, you can take photos of interesting landmarks and provided that the camera time is synchronised with the GPS you can get the positions of the landmarks from the timestamp on the photo and the trackpoint times. This method can be extended to identifying precise start and endpoints for your contours if you take a photo of the reel or your dive computer or compass at each start and endpoint of a contour. This can be very convenient when splitting the track into contours later.
Your data may not be perfect, but it will probably be the best available, which is not too bad, really. A slightly inaccurate map is better than no map.
Processing the data and making the map
editThe track is downloaded to a PC using a cable and software provided with the GPS, and unnecessary track segments edited out. Get rid of segments which are not part of contours, and label the tracks with the depth. I add some reference waypoints in a grid pattern used on my maps, and make a screen dump of the track at highest resolution to clipboard and use GIMP to save it as a png, which I import to Inkscape to draw the charts. Use whatever map projection your GPS software uses for display. converting to another projection is possible, but more work than it is worth, and another opportunity to add errors. The GPS manufacturers will have chosen a projection that is user-friendly at maximum magnification, which is what you need.
These track images are used as background to trace the contours. It helps to first open in a bitmap editor like GIMP or Photoshop and erase the background to transparent. This procedure has the advantage that the images are to a consistent scale. Mark a few waypoints at convenient Lat/Long grid points before screen save (primtscreen) to help position the image on the map in Inkscape. Always use the maximum zoom for the GPS software to retain detail. On the Garmin it is 20 m on the scale bar. The png can be stretched as necessary to get the reference points to coincide with the grid points.
Import the png into Inkscape, scale it as needed and trace the track onto your map. Setting up your lat/long grid at the same scale as the highest resolution from your map software saves a lot of time in the long run, but it is not critical.
Survey procedure
editDepending on the type of dive site you may wish to draw contours, or outlines, or a combination. Positions of features can be recorded by digital camera if you set the time on the camera to exactly match the GPS. Depth profiles can be derived from a dive computer if it is also synchronised, but this can be time consuming for more than a few points.
- The easiest procedures are outlines and contours
- Contours — Choose a depth and swim around the feature with the reel held close to the surface of the feature at the chosen depth. It is advisable to stick to either clockwise or anticlockwise on a specific contour as this reduces confusion when splitting the tracks. Wherever possible swim at least the whole way around each feature and try to swim directly to the next feature to minimise confusion at the computer, or log times of starting and completing each contour on a slate. I often take a photo of the reel and dive computer (for the depth) at critical points like change of contour. This works best if the camera clock is set accurately to match the GPS. You can also use a slate to record the time at point features, and be sure to stop there for at least 30 seconds. When you start a new contour at a different depth it can help to change from clockwise to anticlockwise or vice versa. this makes the changeover point easy to identify.
Swim at a speed you can keep up for a long time without using too much air. Slow speeds make the track more accurate as the float will be more directly above you. Slow down when swimming tight curves or complicated regions, and don't try to get more resolution than about 2m, as the GPS will not measure smaller features with any reliability. If in doubt, try it out, and you will soon get a feel for what is possible and what is worth the effort.
- Outlines — Swim along the edge you wish to outline at a speed which allows the GPS to produce a track with maximum resolution. You can get depths from a decompression computer if this is important, or just take spot readings on a slate. Record start and stop times for the track, and what it is. These things may seem utterly obvious at the time, but can become a bit vague afterwards, when you are trying to work out which track is which on the screen, and it is all very cluttered. When swimming a perimeter it is not important to swim at the bottom if you are not concerned about the depth, you can swim at any depth directly above the perimeter and get adequate results. It is worth taking spot depths along a perimeter, as these are useful data for the map.
The line must be kept under tension to minimise the position error of the float. This is also proportional to speed and depth, and sea state can add noise to the signal, by moving the float as the waves pass. Wave/swell error will tend to be consistent and directional, and is surprisingly small with a low-drag float and thin cord. When the wave height is too much to compensate by arm movement, you can let the line slide through your gloved hand or through a metal fairlead like a bolt snap. When you do this you have to swim a metre or two above the contour, and have to make allowance for average depth as the wave passes. This is closer to the depth of the trough than depth at the crest because water waves are not sinusoidal, but the amount of offset is not easy to estimate. When using this trick, hang a kilogram or two of lead on the reel to provide line tension. A 1.5kg clip-on weight works for me.
Whenever convenient, it is helpful to get a cross check on your accuracy by measuring the same track on different days and different conditions.
Other methods
editYou can take photos and make sketches on a grid on a slate, estimating dimensions and using a compass for directions. This is not very accurate, but can be usable. Surfacing occasionally at major landmarks and taking bearings to fix their position is feasible but not efficient.
Small areas with a lot of detail, such as debris fields of wrecks can be usefully videod with a GoPro or similar, as this will help with features which are too small to resolve with the GPS. A sketch made at the same time is very useful later. A combination of sketch map, video and gps outline can be used to get a quite acceptably useful map of a small wreck on a single dive.
The accurate methods of site mapping used by archaeologists will also give good maps if you can spare the time and have the interest. Methods using tape measures from a set of datum points, or tape measures and a protractor are usually done by two or more divers working as a team. They are not difficult but are time consuming. This sort of accuracy is not needed for a dive site map.
The high tech methods may involve surveys from a boat using side-scan sonar, which can give really high resolution, but the equipment is expensive and sensitive to bumping into large rocks, so is not often used in shallow areas.
Single or multibeam sonar/echo sounders linked to concurrent GPS input and suitable software can produce wireframe images of as high resolution as your equipment depth resolution and your patience or finances can tolerate. These methods require reasonably smooth surface conditions and do not involve diving. I am hoping to get data from this type of survey to combine with the GPS track data when they become available.
As of the end of 2023 a friend has acquired a really good multibeam system and is mapping the region. We plan to do some ultra-high resolution surveys of some of the dive sites. The data is to be used in a thesis so will not be public for a year or two, so I will continue mapping my unfinished sites because I can, and because the comparison will be interesting.